Wednesday, March 07, 2007

Controlling Digital Puppets

Since a few people have emailed me asking about this, here is some more info on the control system I am developing for Panda Puppet and how it works, or at least how I am currently trying to make it work.

Panda Puppet is shaping up as a Python plug-in for Blender. At this stage I am not trying to make it do anything that isn't already possible in Blender's Game Engine, I just want to streamline the way characters can be set-up and controlled in real-time. The core of Blender's GE is Logic Bricks (sometimes called Logic Blocks) which are used to set up and control interactions between different game elements like characters, props, etc.

This is what Blender's Game Logic Panel looks like:

Blender's Logic Brick System

Once again I won't go in to all the technical nitty-gritty of Logic Bricks here, but if you want to learn more just click on the link above.

Panda Puppet's control system is a simplified interface for quickly setting up Logic Bricks in way that's ideal for controlling digital characters. I am still in the early stages of programming this so all of it may change, but this is how I am designing the control system right now:


Click on the diagram to enlarge it

Sensor Type

The sensor type is the type of device used by the puppeteer to control on an on screen character or object. This can be almost any kind of device imaginable, including a joystick, keyboard, gamepad, dataglove or even a Wiimote. I want Panda Puppet to be as flexible and "controller agnostic" as possible. Rather than forcing a puppeteer to adapt to a specific type of input device, I want a control system can be customized to the needs and preferences of a puppeteer and I want different puppeteers performing in a scene together to use different types of controls if they want.

Sensor Input

Sensor inputs are specific types of inputs from an input device. For example, the press of a button on a keyboard or the x-y axis movement of a joystick.

Sensor Action

Sensor Actions are control types that govern a character's action and determine what happens when a puppeteer uses a specific sensor input. There are three different types of Sensor Actions - direct controls, pose controls and emotion controls.

Direct Control
Using direct control a puppeteer has direct control over the movement of a specific part of a digital character. For example, The x-y "walking" movement of a character can be assigned to the x-y axis movement of a joystick so that when the joystick moves in a specific direction the character walks in a corresponding direction.

Pose Control
Pose Control is used to assign specific poses or movements to a specific sensor input. For example, an elaborate shriek or a comedic double-take could be triggered by a joystick button.

Emotion State Control
Emotion State Control influences the movements and poses of a character according to the character's emotion state. An emotion state can be assigned to a specific sensor input and triggered when that control is activated and will influence the character as long as the input control remains active. If the emotion state "happy" is assigned to a joystick's trigger as long as the trigger is pressed the character will remain "happy".

Typically, there are six primary emotional states - anger, disgust, fear, joy, sadness and surprise. Just as primary colours can be modified and mixed to create every other imaginable colour, primary emotional states can also be mixed to create every emotional state imaginable. For example, Anger + Disgust = Rage. Emotion state combinations can be triggered by activating a combination of sensor inputs (when primary emotion states are assigned to individual sensor inputs) or mixed emotion states can be grouped and triggered by a single sensor input.

If anyone out there has thoughts, ideas and/or suggestions about all of this please feel to drop me a line at puppetvision {at} gmail dot com.

Tuesday, March 06, 2007

Rigging a Monkey for Panda Puppet

One of the features that Blender's Ketsji game engine is noticeably lacking is the ability to use shape-keys. In case you're not familiar with them, shape-keys (sometimes called "blend shapes" or "morph targets" in other 3D software packages) allows you to save and store different shapes of your character. In animation this is very useful for doing things like lip sync and creating facial expression.

Working on Panda Puppet I was stuck for quite awhile trying to figure out a work around for this problem until I stumbled across an article on bone based facial animation. I won't bore you with all the details (if you really want them, click the link) but essentially the idea is to stick a bunch of bones in a character's head and have each one control a different area of the character's face.

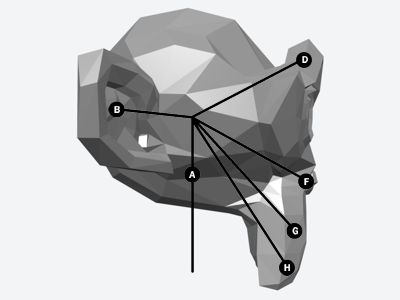
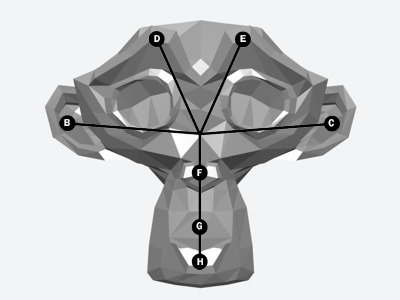
Here's how I am currently rigging using the default monkey head in Blender:


The bones work as follows:

B/C - Ears
D/E - Brow
F - Nose
G - Snout
H - Jaw


Here is a side view, in which the "A" bone (the primary head bone) is visible.

I am working with a low-poly head, made up of about 500 polygons. The poly count could be higher (more polys = smoother shape), but I am keeping it simple for now. Hopefully this "bone-based approach" will work. I need a more or less functional monkey head by March 15th to meet the deadline I am working with. The next week and a half is going to be very, very busy!

Friday, March 02, 2007

Wii Power Glove Controller


A little over year ago I was speculating about using the old NES Power Glove to perform digital puppetry. I haven't heard of anyone doing that just yet, but someone in Japan has hacked together a custom controller using the Wii remote and an old NES Powerglove. The modded glove has specially mounted triggers on the thumb and middle finger to simulate the A and B buttons and an opening for the wii attachment in the back. It seems to work really well, you can see it in action in the clip above. More pics and details are available at Slash Gear.

The obvious digital puppetry application for this would be to make Machinima on the Wii and since so many people have already hacked the Wii remote to use it on their PCs, with a little technical know-how you could really start to have some fun with this thing.

Tuesday, February 13, 2007

What you can't do in Machinima (for now)


This animation test above is a fantastic example of pose-to-pose animation (even if it is a "test") from Pixar. As I've mentioned many times here before, one of the inherent limitations of Machinima as it exists today is that the available authoring tools are really unintuitive and don't allow for much expression. Even the best examples of Machinima puppeteering like the ILL Clan's Trash Talk With ILL Will - which won a Mackie for best virtual performance at 2006 Machinima Awards - are ridiculously crude compared to what most puppeteers and animators can do.


I also like this fantastic clip from Aardman. It's done with Claymation of course, but it's so simple there is no reason something very similar couldn't be done in real-time. There is absolutely no reason high-quality animation work can't be done in real-time. The only problems is that a) you need fast enough hardware to render enough polygons on screen and b) there aren't simplified tools that allow you to create great performances.

All it takes is a little money to solve the first problem and, well, I'm working on the second.

Friday, February 09, 2007

Two and a Half Virtual Men


Many viewers in the U.S. who watched the Super Bowl pre-game show last weekend got their first look in to the virtual world of Second Life thanks to this short promo for the CBS sitcom Two and a Half Men that was created using SL. The big-time exposure is something of a landmark achievement for Machinima, although unfortunately this is a pretty weak piece, no doubt due in part to the fact that it was reportedly produced for CBS in big a rush.

The Two and a Half Men promo was created by The Electric Sheep Company, which usually does better work than this. Visit their Machinima portfolio for some much nicer Machinima examples.

Thursday, February 08, 2007

Where's Waldo?

Waldo C. Graphic, the world's first digital puppetI'm putting together an educational presentation about digital puppetry and Machinima and need a little help. I'm looking for a high quality picture of of Waldo C. Graphic. Any chance any Machin-X readers have a nice, high quality picture of him? Say something 640x480 pixels or bigger maybe? I've done all the usual Google searching and all I've turned up is this one on the right, which is a little too small.
If you've got a pic that you can share please email me at puppetvision [at] gmail dot com. Thanks!

Panda Puppet Progress

Sales Guy
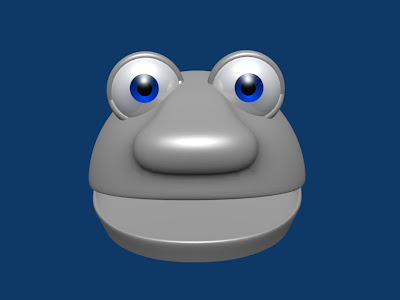
"Sales Guy" is the talking head being used to program Panda Puppet right now.

Just a quick update about ongoing developments with Panda Puppet. The image above is "Sales Guy" the nickname that's been given to the head being used to map and program the facial controls for Panda Puppet. I was hoping to have some video of Sales Guy in action to post here by now, but Sales Guy kind of, uh, broke earlier this week. I'm still trying to get to the bottom of the problem, but I hope to have it resolved before the end of the day today.

What's always interesting about a project like this is that things that you expect to be difficult turn out to be relatively simple while the little things that you expect to be easy end up being very, very hard.

Last week I came to the conclusion that Blender's internal game engine is not really up to snuff. The 3d engine and can't meet all of Panda Puppet's needs (there are plans to overhaul Blender's GE using OGRE, but there's no confirmed time line on when that will happen). I've been exploring using Crystal Space as Panda Puppet's 3d engine via a nifty Blender plug-in called Blender2Crystal. Unfortunately, the plug-in doesn't seem to be widely used and there is limited documentation available so things are slow going on that front.

The other thing I have been looking in to is the Sunflow renderer, which looks promising. Although Panda Puppet will work in real-time, one it's key features is that performances can be tweaked, edited out and rendered out as conventional animation. Sunflow isn't natively supported by Blender right now, but there does seem to be some interest in getting more support for it from the Blender community.

I have learned more about programming and 3D graphics in past three weeks than I have in the previous ten years.

Back with more soon!